Lovable · Capacitor
Lovable mobile app: get it on TestFlight and Google Play
Rokas Kašinskas — Co-founder, VibeViewPublished 2026-10-29Updated 2026-10-29
Lovable · Capacitor
Lovable gives you a working web app quickly. Getting that app onto a phone’s home screen is a different job, and Lovable leaves it to you. This guide covers the whole path.
On October 29, 2026 we took two public Lovable projects through it, one on each of Lovable’s two stacks. Both built and ran on cloud phones, and each cloud build took under a minute. We didn’t do the store upload for them.
Lovable’s own FAQ is direct about it: “Lovable builds web apps and publishing always deploys to a web URL”, and “Lovable has no built-in flow that packages and submits your project to the App Store or Google Play” (Lovable publish FAQ, checked October 29, 2026). It doesn’t generate React Native either. The same FAQ suggests a PWA, or wrapping the app “with Capacitor outside of Lovable”.
Capacitor is a free tool that puts a web app inside a native app project for phones. The app can then use phone features a website can’t, such as push notifications. There are two ways to set it up:
server.url setting). Lovable’s FAQ describes this way. Capacitor’s own docs say server.url “is not intended for use in production” (Capacitor config, checked October 29, 2026). Apple’s review rules also target this kind of app (see below).Capacitor builds for phones and tablets, not TV. VibeView also runs Apple TV, Android TV and Roku apps, but those need a framework that targets TV.
Lovable switched stacks in 2026. TanStack Start “became the default for new projects on May 13, 2026” (Lovable’s TanStack Start page, checked October 29, 2026). Open package.json, the file in your project’s top folder that lists its packages (you can see it in Lovable’s code view). A TanStack Start project lists @tanstack/react-start in its dependencies (Lovable’s hosting guide). You can also ask Lovable “What stack is this project on?”.
@tanstack/react-start: a React + Vite project. npm run build writes a static site to dist/, which is exactly what Capacitor needs. Follow the steps below as they are.@tanstack/react-start is there: a TanStack Start project. Read Projects on TanStack Start first, then come back to the steps.npm and npx, the two commands this guide uses.git clone <your repository URL> in a terminal and go into the new folder with cd <folder name>.You don’t need a Mac, Xcode or Android Studio. We ran the setup on macOS, and its iOS part on Linux too, but not on Windows yet.
Install your project’s packages. In the project folder:
npm installnpm install downloads the packages your app uses. It also writes package-lock.json, a lockfile: a list of the exact package versions, so every cloud build installs the same ones. Commit it in step 5. Lovable itself installs with Bun, so a version can differ slightly from the one Lovable tested.
Add Capacitor. First pick your app’s bundle identifier, the app’s permanent ID in both stores, in reverse-domain form such as com.yourcompany.myapp. Neither store lets you change it later. The first two lines add Capacitor to the project. cap init names the app and creates capacitor.config.ts:
npm install @capacitor/core @capacitor/ios @capacitor/android
npm install -D @capacitor/cli
npx cap init "My App" com.yourcompany.myapp --web-dir dist
--web-dir dist tells Capacitor which folder holds your finished web app. A TanStack Start project uses --web-dir .output/public instead.
Keep the page below the iPhone’s status bar. By default the web page draws under the clock and the Dynamic Island, so a Lovable header ends up behind them. Add one line to capacitor.config.ts:
import type { CapacitorConfig } from '@capacitor/cli';

const config: CapacitorConfig = {
  appId: 'com.yourcompany.myapp',
  appName: 'My App',
  webDir: 'dist',
  ios: { contentInset: 'always' },
};

export default config;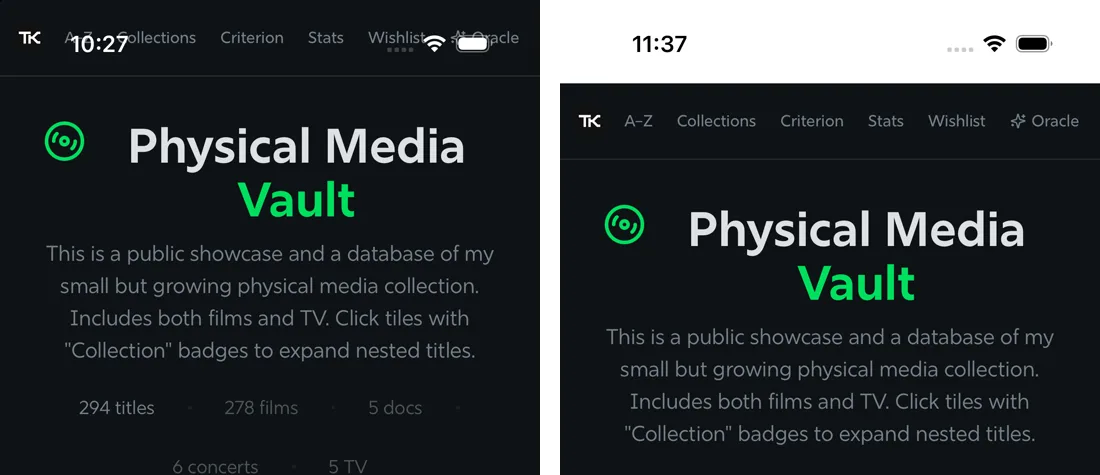
Create the native projects.
npm run build
npx cap add android
npx cap add ios
This creates the android/ and ios/ folders. The cloud build copies your web app into them, but it doesn’t create them, so they have to be in your repository.
Save the new files in git.
git add -A
git commit -m "Add Capacitor"
Don’t push yet. The cloud build uploads the project from your computer, so it doesn’t need the files on GitHub. Before you push to the branch Lovable syncs, read Keeping Lovable and the app in step.
Install the VibeView CLI and sign in.
npm install -g vibeview
vibeview login
The login command prints a link and tries to open your browser. Approve the sign-in there.
Start the cloud builds from a terminal.
vibeview build --cloud --platform android --profile preview
vibeview build --cloud --platform ios --profile preview
--profile preview asks for a build that runs on its own, without your computer. The CLI sees the Capacitor project and suggests a build command for each platform: install, npm run build, npx cap sync, then Gradle or Xcode. Accept it, and choose Create a new app from this build when it asks which app to use. It saves the answers to vibeview.json, as both the preview and the development profile. For Capacitor they are the same build, because the web app is inside it either way.
Run this first build yourself rather than through a coding agent or CI. Without a terminal, the CLI can’t ask its questions. It stops with no "preview" profile for android and prints the lines to add to vibeview.json. Once the file exists, builds run anywhere.
Each build runs on a fresh cloud machine, the iOS one on a Mac, and streams its log to your terminal. In our run, the Android builds took 47 and 52 seconds and the iOS builds 50 to 54 seconds. A successful build creates the app in VibeView from the binary itself, with its name, bundle identifier and icon. Each platform becomes its own app in VibeView. The full reference, including older CocoaPods projects, is in Cloud Builds.
A TanStack Start project renders pages on a server. Its normal build writes server code and assets, with no index.html for Capacitor to load. TanStack Start’s SPA mode (single-page app: one page that loads in the browser and handles every route itself) writes that page (TanStack SPA mode, checked October 29, 2026). In a Lovable project, add the spa line to vite.config.ts, under the server line Lovable already wrote:
import { defineConfig } from '@lovable.dev/vite-tanstack-config';

export default defineConfig({
  tanstackStart: {
    server: { entry: 'server' },
    spa: { enabled: true, prerender: { outputPath: '/index.html' } },
  },
});
npm run build then writes .output/public/index.html, so use .output/public as the web folder in steps 2 and 3. Lovable’s .gitignore already leaves .output out of git. With that change, our TanStack Start project built for both platforms on the first try and ran on both devices. We haven’t checked whether a later Lovable edit keeps the spa line, so look at vite.config.ts after Lovable changes the project.
SPA mode only covers the pages. Server functions and API routes still need a running server. Inside the app there’s no server to answer them, because the app’s own address points at the files on the phone. Your project uses them if any of these is true:
.functions.ts, or code that calls createServerFn.src/routes/api folder.This is common. Of 40 public Lovable projects on TanStack Start we checked on October 29, 2026, 21 had server functions or API routes of their own. Those projects need code changes. Either call Supabase straight from the page, or move the server code into a Supabase Edge Function so any secret key stays on the server. We haven’t done that conversion end to end, so plan for real development time.
Data loads as it does on the web. In our run, the app’s Supabase queries returned live data on both devices, and moving between pages worked on Android.
Sign-in is different:
capacitor://localhost on iOS and https://localhost on Android, Capacitor’s defaults. So the app needs a deep link, a link that opens your app instead of a web page, and that link must be on Supabase’s list of allowed redirect URLs. Start with Supabase’s redirect URLs and native deep linking guides, and Capacitor’s deep links guide. Supabase’s deep-linking page has no Capacitor section, so expect to adapt it.Settings that start with VITE_. Vite copies these values into the app when it builds it. Many Lovable projects commit a .env file, and others write the Supabase address straight into src/integrations/supabase/client.ts. Both work in a cloud build. If your code reads import.meta.env.VITE_... and the .env file isn’t in the repository, the app is built without those values and can’t reach its backend. Store them as build variables instead, once for each platform’s app (vibeview list-apps shows their ids), then run the step 7 builds again:
vibeview env set VITE_SUPABASE_URL "https://your-project.supabase.co" --plain --app <app_id>
vibeview env set VITE_SUPABASE_PUBLISHABLE_KEY "your-publishable-key" --plain --app <app_id>
Each app’s cloud builds then get the values as environment variables, and Vite gives those priority over .env files (Vite env docs, checked October 29, 2026). That’s why --app matters: without it, a build variable applies to every app in your organization and would override another project’s own .env. Our two projects didn’t need this step, so we haven’t run it. Vite also warns that these values are “bundled into your source code at build time”, so anyone with the app can read them. Only use the keys meant to be public there, never a Supabase secret or service role key.
The build from step 7 has your web app inside, so it runs on its own. The quickest way is the dashboard: open the build’s page and choose Run this build, or pick the app on Devices and start a session. From a terminal:
vibeview dev --standalone --platform ios --build <build_id> --detachGet the build id from vibeview list-builds <app_id>, and the app id from vibeview list-apps. If the CLI answers --app is required, add --app <app_id>. The command prints the session’s link and returns. To stop it now, run vibeview dev-stop. Streaming minutes count for as long as it runs, and a session nobody uses ends on its own.
There’s no live reload for a Capacitor app in VibeView. To see a change made in Lovable, pull it and run the cloud build again.
Open Sharing in the dashboard, click Share an app, pick the app, and choose Send a link. The person you send it to opens the app on a live phone in a browser tab, without installing anything. Each visit counts toward your plan’s streaming minutes. Sharing your app has the options.
Create the app in each store first. Make the app’s page in App Store Connect and in Play Console before the first upload; neither store creates it from an upload. Then add your store key in Builds → Stores (how to get one).
Set up signing. VibeView can generate an Android keystore (the file that signs your Android app), and an iOS certificate and provisioning profile from your App Store Connect API key. For Android, add the signing block from App Signing to android/app/build.gradle.
Build and upload.
vibeview build --cloud --production --platform android --auto-submitThe first time, the CLI asks for the release build command and saves it as the production profile. For Android it suggests one for you. With --auto-submit, a successful build goes straight to Google Play.
For iPhone, run the same command with --platform ios. Here the CLI can’t suggest the command, so you enter an archive command yourself. App Signing shows one and lists what it must include, and Upload to TestFlight without a Mac walks through the credentials and the upload. To upload a build later, use vibeview submit --platform ios --latest or vibeview submit --platform android --track internal --latest.
iPhone builds arrive in TestFlight, and Android builds arrive in the Play track you chose. Three things stay in App Store Connect and Play Console: sending the app for review, the store listing and screenshots, and the privacy answers. Store Submission shows where each one is. We didn’t run a production build or a store upload for these two projects.
Apple’s guideline 4.2 says: “Your app should include features, content, and UI that elevate it beyond a repackaged website” (App Review Guidelines, last updated October 16, 2026). A wrapped Lovable app is close to that line, and a remote-URL shell is closer still. Nobody can promise approval. Before you submit, give the app reasons to exist as an app:
Lovable’s GitHub sync is two-way. Changes made in Lovable are pushed to GitHub, and commits pushed to the synced branch come back into Lovable (Lovable GitHub docs, checked October 29, 2026). It syncs one branch, usually main.
Those docs don’t say how Lovable treats files it didn’t create, such as android/, ios/, capacitor.config.ts, vibeview.json and package-lock.json, or your spa line in vite.config.ts. We haven’t tested it. After you push them, make a small edit in Lovable and check that they’re still there and unchanged. If you’d rather not risk it, keep the Capacitor files on another branch and merge Lovable’s changes into it before each build.
With the files and vibeview.json on GitHub, the VibeView GitHub App can build every push. Lovable pushes each change it makes, and each build uses build minutes, so choose which branches it builds.
index.html after npm run build. On TanStack Start, turn on SPA mode as shown above and use .output/public.ios: { contentInset: 'always' } to capacitor.config.ts and build again. If a header that stays at the top (sticky top-0 or fixed top-0) still slides under the clock, remove contentInset, add viewport-fit=cover to the viewport tag in index.html, and add pt-[env(safe-area-inset-top)] to the header’s className instead, as in the Base44 guide. We tested this on a Base44 app, not on a Lovable one.VITE_ values, as described above.bun.lock or bun.lockb, no package-lock.json. Run npm install once and commit the package-lock.json it writes, so cloud builds install the same versions each time.Error injecting safe area CSS in an Android log. It comes from Capacitor and changed nothing visible in our run.No. Lovable publishes to a web address. To reach the App Store or Google Play, wrap the app with Capacitor and build it as a native app, as this guide does. You still send the build for App Store review yourself, in App Store Connect.
Yes, with one caveat. VibeView builds the iOS version on a cloud Mac and opens it on a cloud iPhone in your browser. We haven’t run the Capacitor setup commands on Windows yet. Signing a store build still needs an Apple Developer account.
Usually not for an older React + Vite project: ours built and ran with no code changes. A TanStack Start project needs the SPA setting, and real code changes if it uses server functions or API routes.
Not without extra setup. OAuth and magic links have to return to the app through a deep link, and Supabase has to allow that redirect address. We haven’t tested it.
It can be, if people only need to add the site to their home screen. It won’t give you a TestFlight build or an App Store listing, so use Capacitor for those, or for native features.
Open a live iOS simulator, Android emulator, Apple TV, Android TV or Roku in your browser.
Start free