FlutterFlow · Flutter
FlutterFlow iOS app without a Mac: build and test it live
Rokas Kašinskas — Co-founder, VibeViewPublished 2026-10-29Updated 2026-10-29
FlutterFlow · Flutter
FlutterFlow writes a real Flutter app, but the place you try it is a browser. Seeing the native app on an iPhone normally means a Mac, Xcode and FlutterFlow’s desktop app. This guide gets your FlutterFlow project onto cloud iPhones and Android phones instead, as a native build, not a web preview.
We tested the build and device steps on October 29, 2026 with ReAMP. It’s a public, MIT-licensed app whose code came from a FlutterFlow GitHub push in September 2026. We started from its public repository, not a FlutterFlow account, so the download and Firebase steps follow FlutterFlow’s docs. Both versions built in the cloud, opened on cloud devices and moved between screens. A signed Android bundle for Google Play built too. We didn’t sign in, for a reason explained in the Firebase section below. The builds and the device testing need no Mac; we have only run the setup steps on a Mac so far.
FlutterFlow has three ways to try an app. Two of them run in a browser:
| You want to | Inside FlutterFlow | With VibeView |
|---|---|---|
| See the app quickly | Test Mode or Run Mode, as a web page | The native build on a live device, in a tab |
| Try it on an iPhone simulator | Local Run, on a Mac with Xcode | A cloud build, with no Mac of your own |
| Try it on Android | Local Run, with Android tools set up | The same cloud build command |
| Let someone else try it | A Run Mode link to the web version | A share link that opens the native app |
| Publish to the stores | FlutterFlow’s one-click store deployment | A signed build from your own code (see below) |
FlutterFlow’s own store deployment is a fine way to publish. This guide is about the part before that: seeing the native app run on an iPhone and on Android, without owning a Mac.
You don’t need Flutter, Xcode, Android Studio or FlutterFlow’s desktop app on your computer. Every build runs on a cloud machine. Nothing in the steps needs a Mac, though Windows and Linux are untested.
Connect Firebase and generate its files first, if your app uses Firebase. A FlutterFlow app with sign-in or a database usually talks to a Firebase project. It needs that project’s config files inside the code. In FlutterFlow’s Firebase settings, “click on Auto Generate Config Files and then click Generate Files” (FlutterFlow: Connect to Firebase, checked October 29, 2026). The files then come along with your code. Skip this step if your app has no backend.
Get the code onto your computer. Pick one of two routes:
Download. In FlutterFlow, open the Developer Menu and choose Download Code (Local Run). You get a .zip file. Unzip it. Open a terminal (Terminal on a Mac), cd into the unzipped folder, and make it a git repository:
git init
git add .
git commit -m "FlutterFlow code"
If git has never been set up on this computer, the commit stops with “Please tell me who you are”. Run these two commands once, then commit again:
git config --global user.name "Your Name"
git config --global user.email "you@example.com"
GitHub. Connect a repository in FlutterFlow and push. “FlutterFlow always pushes changes to a branch named flutterflow” (FlutterFlow: Push to GitHub, checked October 29, 2026). Run git clone <your repository URL>, then cd to the folder it creates. Then make your own branch from FlutterFlow’s with git switch -c vibeview origin/flutterflow. The section on keeping FlutterFlow in sync explains why.
Either way you now have an ordinary Flutter project: pubspec.yaml at the top, plus lib/, android/ and ios/ folders.
Install the VibeView CLI and log in.
npm install -g vibeview
vibeview login
A browser page opens. Approve the request there, then return to the terminal.
Build the Android version.
vibeview build --cloud --platform androidThe first time, the CLI sees that this is a Flutter app and asks for the build command, with flutter build apk --debug as the detected default. Accept it. Then it asks which app to attach the build to. Pick Create a new app from this build. The CLI saves both answers in a new vibeview.json file, as the development profile, so you won’t be asked again. If you ever build with --profile preview, the CLI saves the same command as a preview profile too, and you’ll see it in vibeview.json.
Build the iPhone version.
vibeview build --cloud --platform iosThis time the suggestion is flutter build ios --simulator --debug. The --simulator part makes a build that installs on a cloud iPhone, and the build runs on a cloud Mac. Accept it, and pick Create a new app from this build again.
Commit vibeview.json so the build commands stay with the project:
git add vibeview.json
git commit -m "VibeView build settings"
The terminal streams the build log while it runs. In our test, Android builds took about 4 to 5 minutes and iPhone builds about 6. Each successful build creates an app in VibeView with its name and icon, one per platform. It keeps the bundle ID (iOS) and package name (Android) your FlutterFlow project already has. That ID is the app’s permanent identifier in the stores. If yours is still a placeholder such as com.mycompany.…, change Package Name in FlutterFlow’s General Settings (checked October 29, 2026) before your first cloud build, so the apps VibeView creates carry your real ID. If your app uses Firebase, regenerate its config files afterward (step 1).
If a build stops within seconds and its log mentions version solving failed, go to the Flutter version section below. That was the one thing ReAMP needed.
vibeview dev --standalone --platform iosThis starts a cloud iPhone with your newest build on it and opens it in your browser. Click to tap, and type with your keyboard. Swap in --platform android for the Android version. --standalone runs the build on its own, without a connection to your computer. Both of ours were up within 30 seconds. You can also start one from the dashboard: open the build and click Run this build. A device session uses streaming minutes while it’s open. Press Ctrl-C in the terminal to end it.
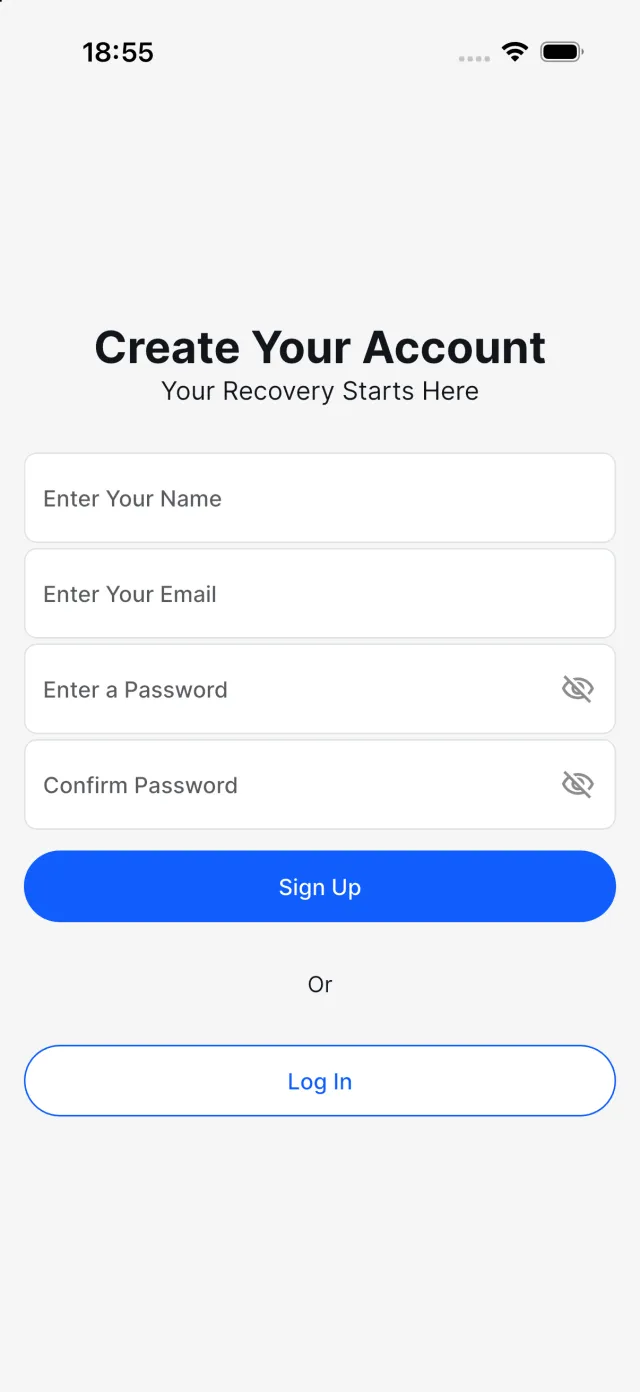
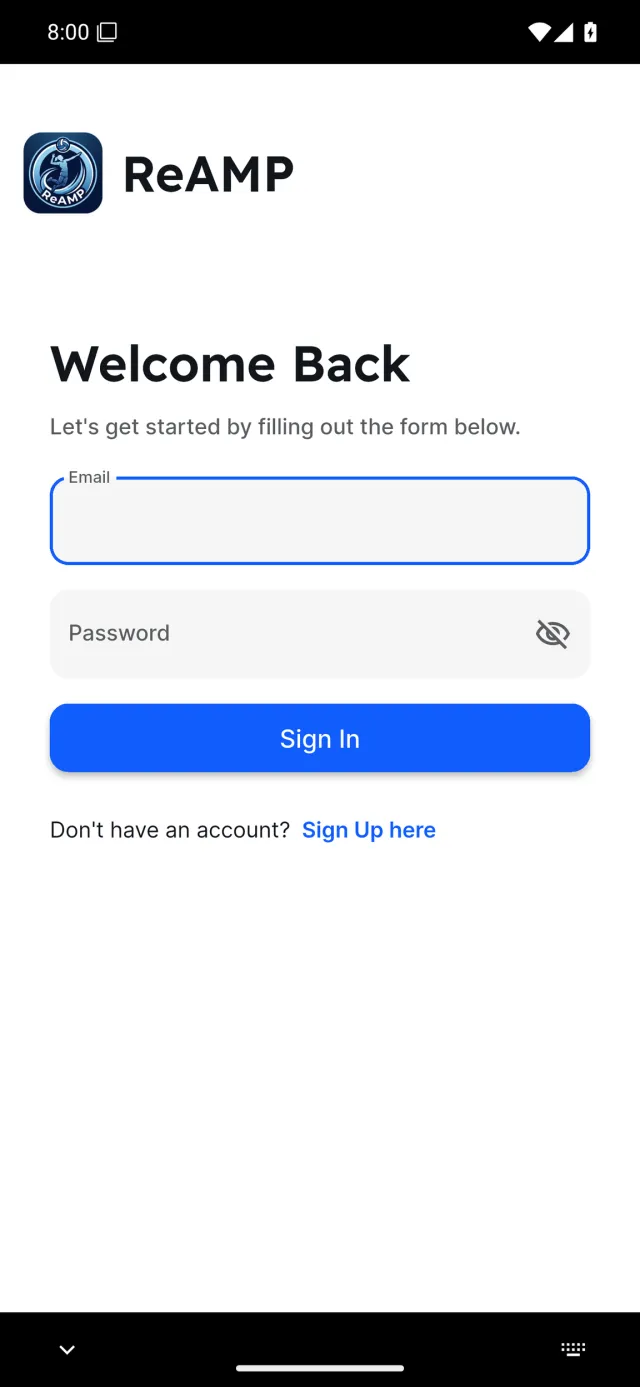
On both phones, ReAMP opened on its sign-up form, and Log In led to the next screen. The screens responded to taps, and the keyboard came up in the email field. We stopped there. With your own app, log in on both platforms and confirm that requests reach your backend.
A FlutterFlow download is tied to the Flutter version FlutterFlow used when it wrote the code. FlutterFlow says it “tends to release a new version of the product each week”, and a minor version can mean “upgrading to a new Flutter version” (FlutterFlow: Pin to FlutterFlow Version, checked October 29, 2026). The cloud builders use a newer Flutter by default, so code from an older download may not compile there.
You’ll see one of these in the build log:
flutter_localizations and intl and ends in version solving failed.font_awesome_flutter, such as 'IconData' can't be extended.page_transition, such as Couldn't find constructor 'CupertinoPageTransitionsBuilder'.ReAMP’s September 2026 code hit the first one on both platforms. There are two ways out:
Download the code again from FlutterFlow. Newer FlutterFlow code is written for newer Flutter versions, so a fresh download will probably build as it is. We haven’t confirmed that with a download from late October, so treat it as likely, not certain.
Build with the older Flutter version. First find your project’s Flutter version. FlutterFlow’s troubleshooting page says to “Locate the displayed Flutter version used for your project” (FlutterFlow: Resolve errors in downloaded code, checked October 29, 2026). Use that number. If you can’t find it, 3.41.9 built ReAMP’s September 2026 code on both platforms with no change to the code. It’s the version that worked for that download, not a number FlutterFlow publishes.
Then put that version in the build commands. fvm is a tool on the cloud builders that runs a chosen Flutter version: fvm spawn 3.41.9 runs Flutter version 3.41.9 instead of the builders’ default. After the change, the vibeview.json the CLI saved looks like this, with the two changed command lines in place:
{
  "defaultPlatform": "android",
  "platforms": {
    "android": {
      "appId": "keep-your-own",
      "build": {
        "profiles": {
          "development": {
            "command": "fvm spawn 3.41.9 build apk --debug",
            "artifact": "build/app/outputs/flutter-apk/app-debug.apk"
          }
        }
      }
    },
    "ios": {
      "appId": "keep-your-own",
      "build": {
        "profiles": {
          "development": {
            "command": "fvm spawn 3.41.9 build ios --simulator --debug",
            "artifact": "build/ios/iphonesimulator/Runner.app"
          }
        }
      }
    }
  }
}
Edit your own file to match, and keep your own appId values. If your file also has a preview profile, change its command the same way. Commit the file and build again. Cloud Builds explains how the builders choose a Flutter version and which ones they keep ready.
Updating the packages in pubspec.yaml by hand doesn’t fix an old download. We tried it, along with newer Android and iOS project settings, and the builds still failed. The reason is that FlutterFlow’s generated code in lib/flutter_flow/ expects the old package versions. Download again, or name the Flutter version.
When Firebase is connected, the download includes its config files (google-services.json for Android, GoogleService-Info.plist for iOS). They point the app at your Firebase project, and the app contacts it as soon as it starts. Sign-in, saved data and anything else behind the login screen depend on that project.
ReAMP’s code points at its author’s Firebase project, so for our device test we swapped in placeholder values for a project that doesn’t exist. With those values the app still opened and moved between its first screens, and the device log showed Firebase rejecting the key. We didn’t sign up or log in. That means we checked that the app builds, opens and moves between screens, not that sign-in works. Check that with your own project.
If you started from someone else’s FlutterFlow template, look at which Firebase project its files name before you build.
These builds don’t need your computer, so other people can open them. In the dashboard, go to Sharing and click Share an app. After you choose this app, select Send a link, then Continue. The person who opens the link uses the native app in their browser, with no install and no FlutterFlow account. Sharing your app lists the other ways to share. Their time on the app counts against your streaming minutes.
FlutterFlow stays the place you design the app, so new code keeps coming from it. Your two additions, vibeview.json and a signing block (see Google Play below), have to survive that.
vibeview.json into it, and the signing block too if you added one.flutterflow into it after each push.Once vibeview.json is committed, pushes to a branch you pick can start builds through the VibeView GitHub App.
The debug builds above are for cloud devices. Publishing needs a signed release build.
production build of the Android version, the CLI suggests flutter build appbundle --release. For an older download, name the Flutter version there too: fvm spawn 3.41.9 build appbundle --release. In the FlutterFlow download we tested, the release build type still used the debug key, as Flutter’s own template does. Paste the signing block that App Signing gives after the buildTypes block in android/app/build.gradle. The block only signs when VibeView holds an Android signing credential for the app, so store or generate one first (signing credentials). Without one, VibeView refuses the production build. The block itself must be in place too, or the bundle comes out signed with the debug key. With both, ReAMP’s signed bundle for Google Play built with no Mac. We didn’t upload it to the store.Store Submission explains the upload step for a signed build.
DreamFlow is an app builder that writes Flutter apps from a prompt. Its docs say the same thing about iPhones: “For app testing on an iOS device or simulator, you need a Mac with Xcode installed.” They also say “Downloading the code is only available with a paid subscription” (DreamFlow: Testing on mobile devices, checked October 29, 2026). Git is “only available for users on the Pro plan and above” (DreamFlow: Git, checked October 29, 2026).
A DreamFlow download is a Flutter project, so the same vibeview build --cloud steps should apply. We haven’t built one yet.
VibeView’s devices cover iOS, Apple TV, Android, Android TV and Roku. We haven’t tried a FlutterFlow app on a TV. Flutter itself doesn’t support Apple TV, and the Flutter section of Cloud Builds lists what an Android TV build needs. TV Testing covers the TV devices.
version solving failed, or errors in font_awesome_flutter or page_transition. Your download expects an older Flutter. Download it again, or name the Flutter version in the build command, as described above.Failed to install Flutter SDK. Start the same build again. In our test, retrying got past it, sometimes after more than one try.vibeview.json.is not a git repository. Run git init, git add . and git commit in it (step 2).vibeview.json. Edit the commands in it directly.flutterflow branch. Keep them on your own branch.Yes. Build the iOS version with vibeview build --cloud --platform ios, which runs on a cloud
Mac, then open it on a cloud iPhone from any browser. You need a FlutterFlow plan that lets you
download the code.
No. Test Mode and Run Mode show a web version of the app. This is the native build for each platform, the same kind FlutterFlow’s Local Run makes.
For the test builds, no. You add a vibeview.json file. An older download may also need the
Flutter version named in its build command. A Google Play build needs a signing block in
android/app/build.gradle.
Start with the builders’ default, which the CLI’s suggested commands use. If the build fails on package versions, download the code again from FlutterFlow, or use the Flutter version FlutterFlow shows for your project. Version 3.41.9 worked for our September 2026 download.
It should with your own Firebase project, whose config files come with your download. We only checked that the app opens and moves between screens, because our test app’s Firebase project belongs to someone else.
Open a live iOS simulator, Android emulator, Apple TV, Android TV or Roku in your browser.
Start free